The Pepper's ghost illusion has been around forever. Here is an excellent description of the effect we are trying to create . Scroll down to the section that reads 'Pepper's ghost made simple'
In our haunt the 'scene' is a black 'electric chair' and the actor will sit in the 'FX' area (see the link above) appearing to be a ghostly victim. Today I experimented with the set after finishing the framing of the FX box and it's definitely not easy to make it work properly. It appears that the sheeting I used for the inside of the FX box is too reflective and shows up in the plexiglass. We will have to add a black cloth sheet over it. The lighting has to be shielded as well. I'm starting to wonder about the plexiglass. I think the only way to make it work will be very tricky lighting adjustments and perfect positioning of the glass. Having to go with plate glass would really be annoying as it is much heavier and will take more time to set up safely.
Halloween 7/24/365

Saturday, July 31, 2010
Monday, July 26, 2010
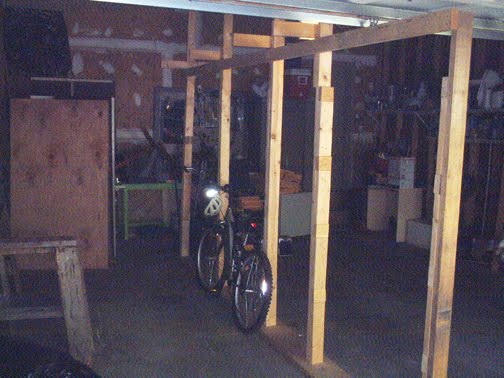
Day 97
RXKUS5MG7N6F Yikes! Less than 100 days already. So we did get the cave eyes for Zone 3 and we'll get into that at a later time. I met with Peter the carpenter to start the planning for the vortex tunnel. We are hoping to have it ready to test by the first week of September. I am going away on vacation for a week and a half from August 4th to 13th. I am really hoping to have the first half of the haunt fully framed out, the vortex hoops water proofed and assembled, the gear motor tested, and the pepper's ghost illusion tested to see if it will actually work. Now I am finishing up Zone 4 framing and the 'black box' for the pepper's ghost illusion. Check out today's video!
Monday, July 19, 2010
Day 104
Framing complete for zone 2! Meanwhile I found an abandoned bees nest in our back yard, completely intact and measuring about 5" in diameter, so I will just have to use it this year. I think this room will be perfect for it. Need to figure out how to add the bees. I do have a great sound bite for it. Here is a short video showing the framing and also the one sliding door that opens into zone 2 from the entrance hall.
Wednesday, July 14, 2010
Day 109


Construction of the sliding door. This opens 'on cue' at the end of the entrance hall. We use 4 x 8 hardboard sheet cut to the appropriate height and reinforced by 2x2's. The '2x2' as it is called is the workhorse framing material for the haunt. Extremely lightweight and cheap. Only a couple dollars for a ten foot piece! We will have an actor pull the door open and closed using a 2x2 extension piece bolted onto the central beam of the door.The door has 3 wheels screwed onto the bottom that ride inside a metal track bolted onto the frame. Then on the top we add a piece of wood to the outside of the frame to catch the top part of the door as it slides closed. That way it can't fall out. There is a wooden stop on the frame at the back end, so when the door is pulled open in the dark it will not slide off the track! We gauge exactly how far we want the door to open so we know exactly where to put the stop. Now again, as I mentioned this central frame was left by our builders and was the key to this whole thing as I could simply build off of that to create all the spaces I needed!
Here is a picture of the vortex tunnel hoop components. 3 packages of 16 1/2 inch plywood segments. These will be bolted together to produce the 10 foot hoops!

Tuesday, July 6, 2010
Tunnel hoops arrive!
As I alluded to earlier, the last part of the haunt this year is actually outside the garage. This is a spinning tunnel that you walk through, commonly known in the haunt community as 'vortex tunnel'. I saw this for the first time at the National Haunters Convention in Philadelphia. I walked through this thing and could not believe the intensity of spatial disorientation. I seriously felt like I could not get through it. Yet the concept seemed fairly simple. A dark 10 x 20 foot long cylinder turning around a stationary bridge that you walk on. Black lighting to light up the glow in the dark spots or whatever on the inside of the cylinder and since that is your only reference, the rotation of the cylinder creates the illusion that you are rotating and this causes you to grab very tightly onto the railing. Now these things fully assembled cost upwards of $8000. Not in the budget. So no question about it...I HAD to build one. Luckily the internet has many examples of home built vortexes and I was able to find a couple that made sense and had a lot of references. We do have a carpenter friend who worked on the house a couple years ago and I have enlisted his services. I also found a resource on another site for obtaining the computer-templated wood pieces that make up the hoops. Thankfully I already have enough equipment and props for the garage so this year's budget is all going toward the vortex.
The vortex hoops are made of 1/2" plywood, 8 pieces to a hoop, double thickness overlapping and bolted together. Since they are 10 foot hoops and the tunnel is 20 feet long, there is no way it's going inside the garage...so no problem. It's a perfect grand finale since there is no way people will be able to get through a haunt of any kind after going through this thing!
This is what we hope to create this year!
Sunday, July 4, 2010
"Master....the Plaaaaaaans"
Yes, of course. The Plans! Actually I start thinking about these as soon as the last haunt is over..or pretty close. Sometimes there are ideas that are in the works for a few years before they materialize. The web is an amazing resource for home haunters. Need some ideas? Here is a site that I have gone back to time and time again: http://www.halloweenmonsterlist.info/
Anyway as I was saying, the challenge for garage haunting is taking a small space and creating the illusion of a much bigger space. You need to create a lot of changes in depth and height. Our garage is unfinished so we have the advantage of 10 foot ceiling height in some areas. Take a look at this initial walkthrough below. We divide the haunt into 'zones' or 'events'. In the video it's difficult to see how the transformation will occur since there still is a lot of junk lying around. That's where imagination is so critical. Here is what we have planned in summary:
Zone 1: entry way which will have a crypt theme. There will be one actor on either side of the entrance hall interacting with the guests
Zone 2: after walking through a doorway which will open 'mysteriously on cue' to the left, there will be a spooky transition room with perhaps spiders, etc.
Zone 3: the cave. Many sets of red blinking eyes will peer into the darkness. One set will be worn by an actor who will approach the guests out of the darkness!
Zone 4: peppers ghost illusion. Not sure why they call it 'peppers ghost'. Anyway, this is a cool effect where you have a scene and an actor projected into the scene appearing as a ghost who then disappears, only to reappear in the actual room where the guests are! We're thinking about doing an electric chair theme. Let's see how that works!
Zone 5: after walking away from the ghost, the guests will enter the prison room where a headless prisoner (live actor) will lunge through the bars and try to grab the guests!
Zone 6 will be a small room where a corpse will surprise guests by leaping out of a trashcan filled with fog and uplighting strobe..a very creepy effect
Finally zone 7 will be a holding area where guests will be greeted by another actor who will monitor their entry into the grand finale...the rotating tunnel that you walk through (commonly known as 'vortex tunnel'). Every year I do one or 2 challenging projects and this is THE ONE. We plan to build it outside the garage as the actual exit...more on this later.
Saturday, July 3, 2010
Halloween 2010- The journey begins
July 3- I think this is the 5th or 6th year now. Every year it grows bigger and crazier, like zombies rising out of the graveyard..so a fellow haunter told me last year. Anyway, this year I decided to create this blog for other home haunters or like minded ghouls who know that on this day there are 121 days until halloween! Probably for the last couple of years I have found myself starting to prepare and build for the 3+ hour show around this time. Somewhere between the middle of June and July 4th. You will see that it is barely enough time for what I need to accomplish!
Today is the day we move one of the 2 cars out of the garage and start the clean out, the planning, the chalk markings on the floor that tell us where the 'halls' will lie. You can see here in this image, it doesn't look like much. I get that. But gradually it is transformed into a creatively creepy illusion, fantasy and the spooktacular 'Halls of Doom' by the end of October. I hope you enjoy this as much as I will. Please read the 'About me' section to get a sense of where all of this came from and where it might be going.
Subscribe to:
Posts (Atom)